
Author: Don

How To Cook A Philly Cheesesteak

Youse Guys Are Gonna Love Carman’s Philly Cheesesteak Sandwich!

Philadelphia, Pennsylvania, is one of the most historic cities in the world. So, we should start this recipe with a little history lesson (Embellished for fun). On a simmering day in the summer of 1930 in the heart of downtown Philly, a hot dog vendor named Pat Olivieri, a bit tired of eating his hotdogs every day, tossed some chopped beef on his grill to make a sandwich for himself. Before he could even take the first bit, the aroma wafted through the open windows of a cab stopped at the corner. The hungry cabby offered the proceeds from his latest fare for the savory sandwich. The rest, as they say, is history.

So, what’s the big deal about Philly Cheesesteak Sandwiches? Ask someone from Philly, and you’ll likely get an earful! And for good reason. You’ll find this historic local delicacy on just about every corner in the City Of Brotherly Love, but the legend of the Philly Cheesesteak now spans the globe. And when you combine the classic recipe with Hagberg’s legendary meats, whether or not you’re from Philadelphia, you’ll feel right at home in Cheesesteak wonderland. A Philly Cheesesteak sandwich is hot beef, and melty cheese piled into a long roll. Naturally, there are many variations of this classic, but we think you’ll really like this one from one of our customers, Carman.

How To Cook Carman’s Hagberg’s Philly Cheese Steak

Ingredients:

  • Hagberg’s chuck eye steak: We’ll cut it thin for you. Our chuck eye is a beefy, tender, and flavorful cut.
  • Veggies: Mushrooms, white onions, and bell peppers.
  • Rolls: Use hoagie rolls with a thinner and chewier profile for a low bread-to-steak ratio so as not to diminish the flavor of the steak.
  • Cheese: Pick your favorite, but we like sharp provolone. Contrary to touristy cheesesteak places in Philly, Cheez Whiz is not recommended!

Prep: (10 minutes)

  • Slice mushrooms, onions, and peppers. Season to taste.
  • Slice hoagie rolls.
  • Heat your preferred griddle/skillet to medium heat.
  • Add a thin layer of mild oil to prevent sticking.

Cook (15 minutes)

  • Start cooking your mushrooms, onions, and peppers to soften them.
  • Partition veggies to one side of the griddle.
  • Grill your hoagie rolls open face down until golden brown. Remove from griddle.
  • Finally, spread the meat evenly on the griddle. Season with a little salt and pepper as the meat cooks, and chop into smaller pieces with the edge of your spatula.
  • Fold in your cheese when the beef turns from pink to medium well. When the cheese begins to melt, fold in the veggies while continuing to chop with a spatula.

After all ingredients are mixed well, pile the mixture onto your grilled hoagie buns and serve immediately. Oh, and leave the cap on the ketchup. This baby doesn’t need anything else except for maybe a napkin.


How To Cook A Hagberg’s Ham

Hagberg’s Applewood Smoked and Double Smoked Hams are moist, tender, and delicious. Available in both boneless and bone-in, our hams are the ideal centerpiece for your holiday feast.

Our Double Smoked Ham starts with an expert smoking. Then, (you guessed it) we smoke it again. The second smoke adds an extra kiss of smokey flavor and enhances the juiciness and texture of the meat.

We smoke our Applewood-Smoked Hams with applewood chip embers. The applewood chips give the ham a subtle, sweet, smokey flavor that complements our ham glaze nicely

How To Cook A Hagberg’s Ham

Cooking Hagberg’s ham couldn’t be easier. Bake uncovered in a baking pan for 12 minutes per pound in an oven preheated to 325°F or until the ham’s internal temperature reaches 140°F. Brush the ham with our glaze for the last 20 minutes of baking.

For a half ham, we suggest putting it cut side down in the pan and adding 8-12 ounces of chicken stock. As the ham warms, the stock will pull up to prevent drying. We’ve found chicken stock to be a better option than plain water. It is quite neutral but won’t “dilute” the ham’s natural flavor.

Hagberg’s Ham Glaze
1 small can of crushed pineapple
1 cup brown sugar
½ teaspoon of ground cloves

Easy To Prepare And Delicious Hagberg’s Skirt Steaks Always Make The Cut!

One look at our meat counter, and it’s obvious – there are many, many different cuts of beef. When choosing a cut, folks often go for familiar favorites like ribeyes, sirloin, and T-bones. And hey, it’s hard to argue with those premium cuts. But every cut of beef (and there are a lot of them) has unique characteristics, and some are better suited for particular dishes.

A delicious cut that is often overlooked is the skirt steak. A skirt steak is a long and flat cut of beef from the beef plate area right under the ribs. It has a rich, beefy flavor, and it’s also easy to prepare. We usually trim our skirt steaks to between 1 and 2 pounds.

How to Cook A Hagberg’s Skirt Steak

Start with the marinade. The skirt steak is made for marinade! Its rich beef flavor combines well with a variety of marinades. We have recipes for a couple of our favorites below.

Bath your skirt steak in your choice of marinade for 3 to 4 hours. Remove from marinade and pat dry to remove all excess liquid and bits of your marinade mix. A dry meat surface will help create that desirable crust everyone loves. Excess moisture reduces the chances of achieving a nice crust on the steak.

A skirt steak is best seared in a hot pan or on a hot grill. Place the steak on preheated a pan or grill on medium/high heat. Cook for 1-2 minutes per side for medium rare. A skirt steak is a thin and lean steak and is best when medium rare. Overcooking can result in a drier, chewier result.

After searing, rest the steak under a foil tent for two minutes, then slice across the grain (generally across the short part of the meat). Serve it up with some roasted potatoes and veggies, and enjoy!

Southwest Marinade
1-½ Cups Red Salsa
2 Cloves Garlic “smashed”
¼ Cup Olive Oil
1 Tbls Worcestershire
1 Tbls Lime Juice

Asian Marinade
1+½ Cups Soy Sauce
2 Tbls Ginger “grated”
1 tsp sesame seed oil
2 Garlic Cloves “smashed”
¼ Cups Olive Oil
1 Tbls Worcestershire
1 Tbls Lime Juice
2 Tbls Brown Sugar


The Reason We Changed Chicken Producers Is Chilling.

The question isn’t why the chicken crossed the road; it’s why we crossed the road to a better chicken producer.

You might remember that a couple of months ago, we announced our switch to a new chicken provider, Pure Prairie Poultry. We’re happy to say that the relationship is now in full swing, and we can offer everything from whole birds to wings. We are excited about working with this company because of its dedication to “pure midwestern values” with farmers in Minnesota, Western Wisconsin, and Northern Iowa. But that’s just part of the story.

What we really like about this company is chilling. Air-chilling, to be specific. And that’s a big deal when it comes to the quality of the chicken AND the impact on the environment.

Pure Prairie Poultry chickens are raised antibiotics-free in a cage-free, climate-controlled barn environment for protection against viruses carried by wild birds, predators, and inclement weather. They’re free to roam the barn and have 24/7 access to nutritious feed and water.

After processing, the chicken meat is cooled quickly and thoroughly to maintain food safety and wholesomeness. Often, providers use a water-chilled method, where many chickens tumble together in a water/chemical bath. In this process, the birds can absorb over 10 percent of their body weight in water, adding unnecessary weight and diluting the chicken’s natural flavor. This method is also a wasteful use of a vital natural resource – water.

At Pure Prairie Poultry, the chickens are cooled using frigid, circulating, purified air on a two-mile-long journey in our chilling room. This air-chilling method not only cuts down on wasteful water usage but also accomplishes the quick cooling of the chickens without adding water weight, making them more flavorful and tender.

If you’re a meat nerd like us, and we know many of our customers are, you’ll quickly notice some differences in 100% air-chilled chicken. Here are a few quick facts from our friends at Pure Prairie Poultry.

  • The chicken looks clean, without pinkish water sloshing around in the package.
  • When prepping, it’s dry to the touch without a wet, slimy feel.
  • The chicken can absorb your favorite seasonings and marinades without excess water to dilute the flavors.
  • When roasted, grilled, and seared, you’ll get a crispier, golden skin.
  • Plus, with 100% air-chilled chicken, you pay for the chicken, not the added weight of retained water.
  • And last but not least, it’s tender, moist, and flavorful – precisely what chicken is supposed to taste like.

Hagberg’s Meatloaf. Comfort Food With A Delicious History!

When it comes to comfort food, everybody has their favorites. But a classic dish that makes just about everyone’s list is meatloaf! In fact, Hagberg’s meatloaf has been bringing delicious comfort to the dinner table for generations – literally. But we can’t take all of the credit. Much of the credit goes to Pawnee’s Bar & Bowling Alley in Bayport, Minnesota, or specifically the grandson of Phyllis Nelson, who shared her meatloaf recipe with us over 20 years ago. Their “Swedago” meatloaf was (and still is) the stuff of legends.

Of course, their original “Swedago” meatloaf recipe started with Hagberg’s legendary ground beef. The other ingredients, however, are a family secret (fortunately for us, Phyllis’s grandson wasn’t great at keeping secrets). Over the years, we’ve tweaked the original Pawnee’s meatloaf recipe to incorporate our own ideas, but one thing is for sure: the meatloaf is as popular (and famous) as ever!

How to cook a Hagberg’s meatloaf.

Aside from the mouth-watering taste, one of the best things about Hagberg’s meatloaf is its easy cooking. We make our meatloaf in either one or two-pound tins ready to pop into the oven. A two-pound meatloaf will take about an hour, and a one-pounder will take about 40 minutes in an oven preheated to 325° F. But remember, oven temps will vary, so check it after an hour or so. The internal temperature should be 160° F. Upon completion, drain any extra liquid from the pan, and it’s ready to slice and serve.

How To Cook Hagberg’s Meatballs

Want To Know What’s In Our Italian Meatball Mix? Fugettaboutit!

Hagberg’s meatball mix is one of those items in our meat case that we don’t often talk about. But now that we’re deep into comfort food season, we thought now would be a good time to cover some meatball basics

First of all, our super top-secret recipe for the best meatballs you’ll find this side of Sicily isn’t really ours! It’s Joe Tucci’s original family recipe from the old neighborhood in St. Paul, MN. But we’ve been making this mix so long, it’s kind of become our own. It starts with just the right blend of ground pork and beef. Mixed with a unique Italian blend of seasonings, bread crumbs, and egg, it leaves our meat case ready to roll.

How To Cook Hagberg’s Italian Meatballs

While I am sure there are other old family methods for making meatballs, as far as we’re concerned, there are basically two schools of thought on how to get the most out of our Joe’s Italian Meatball mix. And neither is complicated at all.

A pound of Joe’s Italian Meatball Mix will make 8-9 golf ball-size meatballs.

Roll & Dunk Method

Roll your meatballs and drop them uncooked into your pot of red gravy (pasta sauce). Let them simmer in the sauce until cooked all the way through.

Tried-And-True Hagberg’s Method

Place your meatballs on a lightly oiled baking sheet to prevent sticking and cook in an oven preheated to 400° F for 20 minutes and cook to an internal temp of 160° F. Drop ’em in the gravy, and they’re ready to enjoy.


Billy’s Tips For Preparing A Delicious Chuck Roast.

A beef chuck roast is a cut from the exercised shoulder area of the cow. A beef chuck roast is a beautiful cut of meat with superb marbling but take care when cooking because it can be tough if not done correctly. Low and slow is the way to go. Slow cooking in relatively low heat nicely breaks down the inherent connective tissues, resulting in a tender, juicy, and delicious experience.

At Hagberg’s we cut our beef chuck roasts to about 3-4 pounds. Naturally, you can request a different size cut, but we think this is an ideal size for easy, consistent preparation.

The ideal vessel for preparing your roast is a roaster with a good-fitting lid. We like enameled cast iron, but any good roaster should do the trick. The beef chuck roast should fit nicely inside the roaster, a couple of inches from the sides. The roast should not touch the sides.

Preheat your oven to 325° F.

While your oven is warming up, rub a little Lawry’s Seasoning Salt on all sides of the roast. Add a little oil to the bottom of the roaster and heat it on your stovetop. Then, gently set your roast on the heated oil and flip it until all of the outside gets a nice brown color. This step can get a little smoky but also starts the delicious aromas permeating the house.

Smear a very thin coating of tomato paste on the roast and set it in the middle of the bottom of the roaster. Then, add equal amounts of beef stock. The total amount of liquid will vary depending on the size of the roaster and roast. Fill so that the entire bottom of the roast rests in about a half-inch of the beefy bath.

Place the covered roaster into your preheated oven and cook for about one hour per pound. If you’re adding veggies, drop them on and around the roast for the last hour of cooking.

At the end of the cooking time, the roast should set covered for about 10 minutes before serving.

Now, if this is your first roast rodeo or you’re not confident about your oven temps, you have to check to ensure your roast is thoroughly cooked. But don’t wait too long. While an underdone roast can be tough, an overdone roast can be dry. You can always cook an underdone roast a little longer to finish it off, but there’s no going back from overdone. Use a meat thermometer to ensure the meat is up to temp and do the fork test. A perfectly done roast will pull apart easily with a fork.


Our 12 Meats Of The Holidays.

Have you placed your holiday season meat orders? From formal dinners to casual parties, it’s the season for getting together with friends and families, and the centerpiece of any holiday celebration is meat, of course. We have a meat case full of delicious options, but we encourage you to call and order your meats in advance! Choosing the right meat can be a little overwhelming, so we thought we’d put together a few traditional and not-so-traditional items you’ll find at Hagberg’s. So, in no particular order, here are our 12 meats of the Holidays.
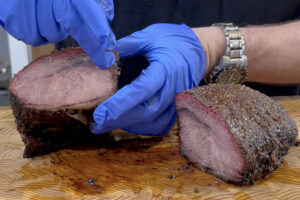
1. Beef Tenderloin
Tender and juicy, roasted beef tenderloin is a popular cut of beef for holiday dinner tables. It’s a more expensive cut often reserved for special occasions. But don’t skimp. Plan on at least 8 ounces per person. A 3-pound beef tenderloin should be about the right size for six people.
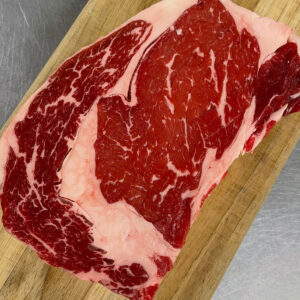
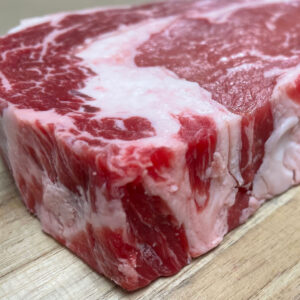
2. Prime Rib
Right up there with turkey and ham, prime rib is a favorite cut for adorning holiday dinner tables. It has a large “eye” of meat in the center, which is juicy, tender, and marbled with delicious fat.

3. Ham
The Christmas ham is a quintessential centerpiece of many holiday feasts. It’s a breeze to prepare and it’s always sure to please for any size gathering.
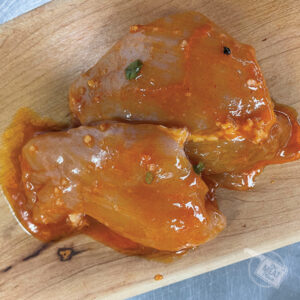
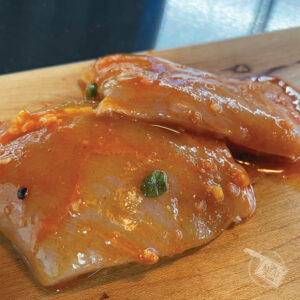
4. Porketta Roast
Fill your kitchen with the warm aromas of this Iron Range tradition. Hagberg’s Porketta Boneless Pork Loin Roast is expertly flavored with fennel, paprika, and garlic.

5. Rump Roast
Sometimes called a “Holiday” roast, this beef is packed with flavor.
Go traditional, or try it with a little dry rub. A 3-pounder only takes about an hour at 300°F to cook for medium or medium-rare.

6. Pork Tenderloin
Our Boneless Pork Tenderloin naturally contains more flavor without added water or ingredients. Easy to prepare, sear the sides in a skillet, then bake at 400°F for 20-25 minutes. Cooking time may vary, so use a meat thermometer. Remove it from the oven when it reaches 145°F.

7. Pork Loin Roast
A pork loin roast is wide and thick, with a sizable (yet very tender) fat cap running along the top, unlike a narrower pork tenderloin with much less fat. Roast our boneless pork loin roast fat side up (to keep those savory juices flowing) at about 20-25 minutes per pound at 350 °F. Remember, this isn’t chicken, so a little pink is okay.

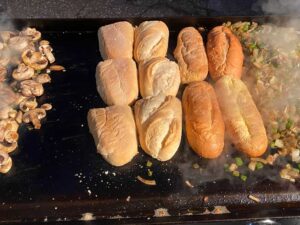
8. Shredded Beef and Pork
A fast and easy party favorite, our shredded beef and pork are ideal for simple, festive sandwiches at casual holiday get-togethers. Plan on about one pound per 3-4 people. And be sure to check out our sauce selection.

9. Polish Sausage
“Polish” for sausage, our traditional version of this world-famous Kielbasa, is secretly spiced and expertly smoked just as it has been for generations.

10. Meat ‘n’ Cheese Chunks
We like to call it “meat candy.” No holiday party is complete without a bowl of smokey meat sticks, jerky bits, and chunks of cheese in various flavors. Ask for Hagberg’s meat and cheese chunks at our deli.

11. Pie
Yeah, we know; why is pie on a holiday meat list? No holiday feast is complete without a sweet treat, regardless of the meat you decide to serve. We always have a nice selection of pies in the cooler next to the deli.

12. Bacon
We know, we know. Bacon isn’t “traditional” holiday meat. But face it, bacon makes every day more festive. At Hagberg’s, we have a large section of the meat case dedicated to a variety of smoky bacon flavors. Whether using it as a wrap to create delectable hors d’oeuvres, adding bits to your green beans and salads, or just serving it up as a savory side, Hagberg’s freshly sliced-to-order bacon will become your new holiday tradition!

Want more ideas? We have a meat case full of tasty options!

We’re Spreading Our Wings With A New Chicken Producer.

If you know us, you know that at Hagberg’s, we don’t rest on our rump roast (so to speak). We’re always looking for fresh ideas and new sources that support our goal of providing fresh, local, delicious, and sustainable meats and eats to our loyal customers.

We are delighted and excited to announce that this week, we’re introducing to a new chicken provider – Pure Prairie Poultry. Pure Prairie Poultry is a company dedicated to “pure midwestern values” with farmers in Minnesota, Western Wisconsin, and Northern Iowa. The chicken is processed in Iowa not far from our premium beef provider.

The chickens are raised in a cage-free, climate-controlled barn environment for protection against viruses carried by wild birds, predators, and inclement weather. Chickens are free to roam the barn and have 24/7 access to nutritious feed and water. But that’s just for starters.

Here are a few more reasons why we’re making the switch to Pure Prairie Poultry:

  • The chickens are raised by career farmers who have an ownership stake AND who really know chicken
  • The chickens are raised incorporating sustainable farming practices
  • Chickens are 100% air chilled (We’ll elaborate on this one later in the article)
  • No antibiotics or hormones EVER
  • 100% vegetarian fed

Most of these concepts are pretty clear and understandable, but for you meat nerds out there, we’re excited about the air-cooled process used by this provider.

“Air-Chilling” is cool! (See what we did there?)

After processing, the chicken meat must be cooled quickly and thoroughly to maintain food safety and wholesomeness.

Often, providers use a water-chilled method, where many chickens tumble together in the water/chemical bath. In the process, the birds can absorb over 10 percent of their body weight in water, adding unnecessary weight and diluting the chicken’s natural flavor.

At Pure Prairie Poultry, the chickens are cooled using frigid, circulating, purified air on a two-mile-long journey in our chilling room. This air-chilling method not only cuts down on wasteful water usage but also accomplishes the quick cooling of the chickens without adding water weight, making them more flavorful and tender.

We look forward to offering the exceptional chicken from Pure Prairie Poultry.

Not All Turkeys Are Of The Same Feather.

Don’t chance the biggest meals of the year on a typical frozen grocery store bird. Our turkeys are fresh and local from Ferndale Market, located in Cannon Falls, Minnesota. And fresh really matters. Here are a few points about going with a fresh, never-frozen Ferndale Market bird from Hagberg’s for your holiday dinner centerpiece.

For starters, and most important of all, they taste better! Fresh turkeys tend to hold their moisture much better than frozen turkeys, bringing out a meaty texture and resulting in a juicier, more flavorful flavor.

Of course, the most crucial factor of a delicious bird happens before it hits our meat case. At Hagberg’s, we source from Ferndale Market, a third-generation range-free turkey farm committed to raising free-range, antibiotic-free, and naturally processed turkeys.

And fresh turkeys tend to cook a bit faster than their previously frozen and thawed counterparts. A rule of thumb is about 15-20 minutes per pound at 325°F. HOWEVER, oven temps and times will vary. Plus, you’ll likely be sharing that oven heat with other holiday delectibles. Use a meat thermometer BEFORE the end of the estimated cooking time to avoid overcooking. Place the thermometer in the breast. The turkey is done at an internal temperature of 165°F.

Then, give the turkey a little rest under a tin foil blanket for about a half hour. Resting after removing from the heat allows the natural juices released during cooking to be reabsorbed back into the meat.

Consider A Custom Cut

At Hagberg’s, you get more than a great Minnesota bird. For a nominal custom-cut fee (most custom cuts are $8.00 per bird), we can prep your turkey to your tastes, including deboning, parting out, and spatchcock. Inquire at the meat counter for custom prep charges. Please note that we don’t offer a pre-stuffing option, as this should only be done immediately before cooking.

What The Heck Is Spatchcock?

Spatchcock is what we meat cutters call “butterflying.” This increases the surface area of the bird, allowing it to cook more evenly and in less time. This helps the dark meat cook as quickly as the white, resulting in juicy turkey in about half the time.

Our Take On Reverse Searing.

Have you ever tried to count all the different cuts of beef in Hagberg’s meat case? Neither have we. There are a lot of them. And, like our cuts, there are almost as many methods to prepare them – from grilling to roasting to sous vide. So, is there one best way to prepare a Hagberg’s steak? Well, no. That’s up to personal preference, but here is a method that we often use at home. It results in what so many of us love in a steak – a deliciously charred crust with a juicy and tender inside. If you’re a seasoned meatatarian, you probably already know all about reverse searing. If not, here’s an easy-to-follow primer to get you deliciously down the path – in reverse.

So, what is the reverse searing method for cooking steaks? As the name suggests, reverse searing takes what many of us learned about cooking steaks and turns it upside down.

Traditionally, steaks have been cooked on one appliance – think grill, stovetop in a skillet, or oven. Rather than dropping the raw steak on a grill or skillet and cooking the steak from outside, the reverse sear does the opposite. This method involves cooking the meat to the desired doneness low and slow in the oven or on a grill first. Then, the steak is seared in a cast-iron skillet or flat-top grill to create the beautifully rich and crispy crust that we all associate with a perfectly cooked steak.

Preheat your oven to 275° F – 300° F. Rub your steak with a bit of salt and pepper to taste and place it on a wire rack on a baking sheet with sides. (You don’t want those delectable juices flowing into your oven.) Put the sheet uncovered in the center of the oven and cook for 20-30 minutes until the required doneness is achieved. Remove and tent with tin foil and rest for 5 minutes before searing and serving.

While this might seem like a lot of work to go through for a perfect steak, consider the alternative–a less-than-perfect steak, and believe us, this is worth the minimal effort.

So, why is the reverse sear so awesome? Cooking the steak slowly with a controlled oven temperature makes preparing it to your exact preferences easier. See our detailed steak doneness chart for the varying degrees of doneness. Note that you can’t rely on the inside color of the meat to determine doneness. It is best to use a meat thermometer. For reference, we suggest cooking the steak in the oven to an internal temp of 115° F and then searing it in a cask iron skillet until it reaches the final temp of 130° F to 145° F.

Plus, when the steak starts in the oven, the heat dehydrates its surface, priming it for the searing. With less juice on the surface area of the steak, the sear is more effective, resulting in that perfect steak crust.

And you get the extra benefit of the coveted steak drippings and juices from the oven pan to drizzle over the steak after searing.

How To Cook A Hagberg’s Chuck Roast

A beef chuck roast is a cut from the exercised shoulder area of the cow. A beef chuck roast is a beautiful cut of meat with superb marbling but take care when cooking because it can be tough if not done correctly. Low and slow is the way to go. Slow cooking in relatively low heat nicely breaks down the inherent connective tissues, resulting in a tender, juicy, and delicious experience.

At Hagberg’s we cut our beef chuck roasts to about 3-4 pounds. Naturally, you can request a different size cut, but we think this is an ideal size for easy, consistent preparation.

The ideal vessel for preparing your roast is a roaster with a good-fitting lid. We like enameled cast iron, but any good roaster should do the trick. The beef chuck roast should fit nicely inside the roaster, a couple of inches from the sides. The roast should not touch the sides.

Preheat your oven to 325° F.

While your oven is warming up, rub a little Lawry’s Seasoning Salt on all sides of the roast. Add a little oil to the bottom of the roaster and heat it on your stovetop. Then, gently set your roast on the heated oil and flip it until all of the outside gets a nice brown color. This step can get a little smoky, but it also starts the delicious aromas permeating the house.

Smear a very thin coating of tomato paste on the roast and set it in the middle of the bottom of the roaster. Then, add equal amounts of beef stock. The total amount of liquid will vary depending on the size of the roaster and roast. Fill so that the entire bottom of the roast rests in about a half-inch of the beefy bath.

Place the covered roaster into your preheated oven and cook for about one hour per pound. If you’re adding veggies, drop them on and around the roast for the last hour of cooking.

At the end of the cooking time, the roast should set covered for about 10 minutes before serving.

Now, if this is your first roast rodeo or you’re not confident about your oven temps, you have to check to ensure your roast is thoroughly cooked. But don’t wait too long. While an underdone roast can be tough, an overdone roast can be dry. You can always cook an underdone roast a little longer to finish it off, but there’s no going back from overdone. Use a meat thermometer to ensure the meat is up to temp and do the fork test. A perfectly done roast will pull apart easily with a fork.  

How To Cook A Hagberg’s Bacon

If you’re a Hagberg’s bacon connoisseur, you probably have your favorite flavors and your favorite way of cooking it, too. But we get a lot of early adopters who need a little instruction on how to get the flavorful best from Hagberg’s bacon.

Here are a few tips on how to get the most from these strips.

First, pick the thick.

Are you a thin and crispy type of person, or do you like your bacon with a bit of heft? You can’t go wrong either way, it’s really a matter of personal taste. Not sure? Ask us to give you a range of thicknesses and test ‘em out at home. Do you have a variety of bacon preferences in your home? No problem, we can trim your order in various thicknesses.

Okay, now it’s fry time.

Our bacon needs no special prep. With a controlled heat source and the proper pan, you’re ready to go. Old-school stove-top pan frying in a good cast iron skillet is one way to go, but it can be a very messy procedure. Plus, you can only fit so much bacon in a frying pan, and we all know there is never enough bacon.

We strongly recommend this method for consistency, safety, and much easier clean-up. It’s simple and fast, and once you have your appropriate cooking times down for the bacon thickness, it’ll always be prepared the way you like it best.

It’s important to note that your cooking times will vary depending on the thickness of the bacon and your preference for crispiness. Use this as a starting point and adjust the time as needed.

Start with a raised-edge cookie sheet/pan. The size isn’t important but the larger the pan, the more bacon you can fit! The raised edge is important, though. It’ll hold in the grease and keep the clean-up to a minimum. It’s not necessary, but you may even want to line the pan with parchment paper to make cleanup even easier. 

Cook in your oven preheated to 325° F for 20-25 minutes. Again, the time may vary depending on your preferences. Remove and set on paper towels or on a cookie rack with paper towels underneath to absorb/drain any excess grease.

Attention Bacon Connoisseurs And Those Who Wish To Be.

Our bacon always has the featured spot in the meat case – and for good reason – it’s one of the most popular items we sell! From the traditional smoky flavors to more exotic combos, we’re always smokin’ up fresh ideas. If you’re a Hagberg’s bacon connoisseur, you probably have your favorite flavors and your favorite way of cooking it, too. But we get a lot of early adopters who need a little instruction on how to get the flavorful best from Hagberg’s bacon.

Here are a few tips on how to get the most from these strips.

First, pick the thick.

Are you a thin and crispy type of person, or do you like your bacon with a bit of heft? You can’t go wrong either way, it’s really a matter of personal taste. Not sure? Ask us to give you a range of thicknesses and test ‘em out at home. Do you have a variety of bacon preferences in your home? No problem, we can trim your order in various thicknesses.

Okay, now it’s fry time.

Our bacon needs no special prep. With a controlled heat source and the proper pan, you’re ready to go. Old-school stove-top pan frying in a good cast iron skillet is one way to go, but it can be a very messy procedure. Plus, you can only fit so much bacon in a frying pan, and we all know there is never enough bacon.

We strongly recommend this method for consistency, safety, and much easier clean-up. It’s simple and fast, and once you have your appropriate cooking times down for the bacon thickness, it’ll always be prepared the way you like it best.

It’s important to note that your cooking times will vary depending on the thickness of the bacon and your preference for crispiness. Use this as a starting point and adjust the time as needed.

Start with a raised-edge cookie sheet/pan. The size isn’t important but the larger the pan, the more bacon you can fit! The raised edge is important, though. It’ll hold in the grease and keep the clean-up to a minimum. It’s not necessary, but you may even want to line the pan with parchment paper to make cleanup even easier. 

Cook in your oven preheated to 325° F for 20-25 minutes. Again, the time may vary depending on your preferences. Remove and set on paper towels or on a cookie rack with paper towels underneath to absorb/drain any excess grease.

When Is Done Done?

The “doneness” of beef truly comes down to personal preference, but it’s essential to know when done is done before you fire up the grill. Remember to use a meat thermometer because you can’t rely on finger temp and color to indicate doneness. Insert the meat thermometer through the side of the cut to the center of the meat abiding touching fat or bone. And remove them from the heat when the thermometer is 5°F lower than your desired doneness. They’ll continue to cook, and the temp will continue to rise for a few minutes while they sit. Sitting also allows the juices to be reabsorbed into the meat, resulting in a juicer experience. The USDA recommends steak be cooked to at least 145°F and sit for at least 3 minutes. Ground beef should be cooked to at least 160°F. 

Here’s a quick overview of steak doneness.

Rare

Cooked quickly, leaving the center cool and red. If you are wondering, steak doesn’t contain the contaminants that chicken and pork do, so eating it rare doesn’t pose any health risks.

Medium Rare

Warm with a firm sear on the outside and a juicy and soft pink to red in the center. 

Medium

A firm outside char but a lot less pink on the inside and a slightly more pronounced pink center.

Medium Well

Cooked pretty thoroughly with just a bit of pale pink for those who want a slightly juicy steak without any blood.

Well-Done

Look, Mom, no pink! Charred on the outside, a greyish-brown all through with no sign of pink. If you like your steak well done, we suggest cooking low and slow to avoid toughening.

How To Cook A Hagberg’s Fun Guy Joe

We put the “Fun” in fungi. (Along with some other delicious ingredients.) Hagberg’s Fun Guy Joes are a unique creation of meaty mushroom caps stuffed with Joe’s Italian Sausage, the authentic Joe Tucci Italian sausage recipe. Topped with a sprinkle of mozzarella and a dusting of parsley, these’ll take you back to the old hood in East St. Paul – even if you’ve never been there!

Easy to prepare, simply place these Fun Guys on a lightly oiled baking pan and place them into a preheated oven at 375° F. After 18 minutes, they’re ready for serving.

Know when done is done. Find a chart for USDA-recommended internal meat temps here.

How To Cook A Hagberg’s Cubano

The Cubano is a Hagberg’s original and is one of the most popular specialty items in the meat case. The sandwich of the same name may inspire it, but you’ll find this Cubano creation in the meat case. It combines a boneless pork loin wrapped around our shredded porketta, swiss, and ham and smeared with cilantro pesto and mustard pickle relish.

To cook, place your Cubanos on a lightly oiled baking pan and cook in a 400° F preheated oven for 15 minutes. Flip and continue cooking for 25 minutes. Rest for 10 minutes before serving.

Know when done is done. Find a chart for USDA-recommended internal meat temps here.

How To Cook A Picanha

Picanha translates to rump cap or top sirloin cap with the fat intact. And that’s important because the fat produces a lush coating of flavor and juiciness, and it actually can protect the meat while grilling.

We received this excellent method for preparing picanha in a Big Green Egg and finishing on a flat top from one of our favorite customers (Thanks, Todd!).

Here are Todd’s tips for making a perfect picanha at home. Start on the Big Green Egg preheated to 250°F. Let it cook for about 90 minutes or until the internal temp is 125°F. Then finish it on a hot flat top for a minute or so per side. Let it rest for about 10 minutes. Slice against the grain, moving on a radius for half-inch slices, and serve.

A bearnaise or chimichurri sauce would be an excellent addition, but as you can see by the picture, this flavorful cut doesn’t need any extra ingredients to get your mouth watering.

Know when done is done. Find a chart for USDA-recommended internal meat temps here.

How To Cook Hagberg’s Dressing Stuffed Pork Chops

Our Dressing Stuffed Pork Chops start with expertly trimmed Minnesota premium Duroc pork chops stuffed with Hagberg’s sage and onion stuffing. Duroc is a premium pork with superior marbling and an optimal fat content, resulting in a juicer, more tender product and a lean, clean flavor.

To cook, gently season with salt and pepper to your liking. Place on a lightly oiled baking sheet to prevent sticking. Cook in your preheated oven at 450°F for 15 minutes. Flip and continue cooking for another 15 minutes. Rest for 10 minutes before serving.

Know when done is done. Find a chart for USDA-recommended internal meat temps here.

How To Cook Hagberg’s Cousin Vinny

You’ll enjoy this “new” Italian classic in just a half hour.

Our Cousin Vinny is a Hagberg’s original developed around the authentic Joe Tucci Italian sausage recipe from the old neighborhood in East St. Paul. It features an expertly trimmed beef tenderloin rolled around Joe’s Italian Sausage, sundried tomatoes, mozzarella cheese, and fresh spinach.

Place your Cousin Vinny on a lightly oiled baking sheet to prevent sticking, and cook in an oven preheated to 425° F for 10 minutes. Flip and continue cooking for another 10 minutes. Rest for 10 minutes before serving.

Know when done is done. Find a chart for USDA-recommended internal meat temps here.

How To Cook Mashed Potato Stuffed Pork Chops

This easy-to-make-at-home meal has become a customer favorite. Hagberg’s Mashed Potato Stuffed Pork Chops are pork chops stuffed with mashed potatoes, topped with a little cheese, and sprinkled with just the right spice!

Place on a lightly oiled baking sheet and cook in an oven preheated to 425°F for 20 minutes. Drop the temp to 375°F and continue cooking for 10 minutes. Rest for 10 minutes before serving, and enjoy!

Know when done is done. Find a chart for USDA-recommended internal meat temps here.

How To Cook Hagberg’s Skinless Chicken Thighs

Hagberg’s marinated boneless skinless chicken thighs have quickly become a very popular item from our meat case. (Make sure you make it to the end of the meat case to find them basking in their bath.) They’re juicy cuts of delectable dark meat marinaded in a bath of Hagberg’s Korean BBQ marinade. Our customers have reported enjoying them in a variety of ways; baked and served center plate with a starch and veggies, grilled and sliced atop a rice bowl, and even as the main ingredient of Asian fusion street tacos. Aside from the savory flavor, our boneless, skinless marinaded thighs are a breeze to prepare on a grill, in the oven, or on the stovetop.

On the grill: Preheat the grill to 400° F. Cooking times will vary slightly, but the thighs will take about 10-12 minutes to grill. Turn halfway through cooking. Cook to an internal temp of 165° F.

In the oven: Preheat oven to 400° F. Place thighs in a lightly oiled baking dish. Cook for about 30 minutes. Cook to an internal temp of 165° F.

On the stovetop: Coat the bottom of a skillet with oil and heat. Place the chicken thigh in the heated oil. Turn after about 5 minutes and cook for another 6 minutes. Again, cooking times may vary, but cook to an internal temp of 165° F.

Know when done is done. Find a chart for USDA-recommended internal meat temps here.

How To Cook Hagberg’s Jerry’s Fingers

Hagberg’s Jerry’s Fingers are strips of beef tenderloin wrapped with Hagberg’s own double-smoked bacon and coated with an earthy yet mild cayenne seasoning. It’ll ROCK your world! To cook, place your Jerry’s Fingers on a lightly oiled baking sheet and cook in an oven preheated to 375°F for 15 minutes or until reaching an internal temperature of 140°F. Rest for four or so minutes before serving.

Know when done is done. Find a chart for USDA-recommended internal meat temps here.

How To Cook Mashed Potato Stuffed Chicken Breasts

The concept is simple, but the flavor is extraordinary! Our Mashed Potato Stuffed Chicken Breast is just that – A chicken breast stuffed with mashed potatoes. But we don’t stop there. A layer of mozzarella and a sprinkle of spice add just the right finish to this easy-to-make masterpiece.

Super simple and super delicious. Place them on a lightly oiled baking sheet and cook in an oven preheated to 425°F for 28 minutes. Rest for 5 minutes before serving.

Know when done is done. Find a chart for USDA-recommended internal meat temps here.

Our Jerry’s Fingers Rock!

Once in a while, you get shown the light, in the strangest of places if you look at it right. And you can always find a little delicious inspiration in the Hagberg’s meat case – right next to Jerry. Grab your favorite bootleg and enjoy a “Jerry’s Finger” in honor of legendary guitarist and cultural icon, Jerry Garcia. What’s a Jerry’s Finger? It’s a strip of beef tenderloin wrapped with Hagberg’s own double-smoked bacon and coated with an earthy, yet mild cayenne seasoning. It’ll ROCK your world! And they’re really easy to cook! Place your Jerry’s Fingers on a lightly oiled baking sheet and cook in an oven preheated to 375°F for 15 minutes or until reaching an internal temperature of 140°F. Rest for 4 or so minutes before serving.

Hagberg’s Phil’s Bombs

Inspired by the legendary bass player, Phil Lesh, these bombs will strike a massive chord and get your taste buds thumping. Phil’s Bombs are jumbo mushrooms stuffed with Hagberg’s own Chorizo Verde blend, smoked cheddar, and finished with a dusting of paprika.

How to cook a Hagberg’s Phil’s Bombs.

Just grease up a baking sheet to keep ‘em from sticking and pop them into your preheated oven at 375° F. After 18 minutes, they’re ready for serving.

Continue reading

Marinated Boneless, Skinless Chicken Thighs

Why should the breasts have all the fun?! Sure, chicken breasts are one of the most versatile proteins out there, but folks often overlook the delicious merits of the thighs – especially when prepped by the experienced meatatarians behind the Hagberg’s meat counter. First, we trim out the bones, excess fat, and skin, leaving a juicy piece of delectable dark meat. But we don’t stop there. The thighs then take a dip in our meat case in a bath of our own Korean BBQ marinade, where they wait to accompany you home to your kitchen.

The thighs have quickly become a very popular item from our meat case. (Make sure you make it all the way to the end of the case to find them basking in their bath.)

Hagberg’s customers have reported enjoying them in a variety of ways. Baked and served center plate with a starch and veggies. Grilled and sliced atop a rice bowl. And even as the main ingredient of Asian fusion street tacos.

Aside from the savory flavor, our boneless, skinless marinaded thighs are a breeze to prepare on a grill, in the oven, or on the stovetop.

How to cook Hagberg’s Marinaded Boneless, Skinless Chicken Thighs

On the grill: Preheat the grill to 400° F. Cooking times will vary slightly, but the thighs will take about 10-12 minutes to grill. Turn halfway through cooking. Cook to an internal temp of 165° F.

In the oven: Preheat oven to 400° F. Place thighs in a lightly oiled baking dish. Cook for about 30 minutes. Cook to an internal temp of 165° F.

On the stovetop: Coat the bottom of a skillet with oil and heat. Place the chicken thigh in the heated oil. Turn after about 5 minutes and cook for another 6 minutes. Again, cooking times may vary, but cook to an internal temp of 165° F.


Butternut Squash Soup

The ingredients are straightforward, but there is definitely some magic happening in the kitchen. This savory seasonal soup (say that three times fast) is one of the most asked-for soups we make. Hagberg’s Butternut Squash soups start with large dices of butternuts squash sprinkled with a bit of salt, pepper, and brown sugar. Then we add some Minnesota butter and bake it until it’s ready for our own Hagberg’s stock. Then it’s time for a little whisking, thickening, and simmering with some heavy cream. Finally, we add a dash of TLC serves it with some crumbles of Hagberg’s own smoky bacon.

Continue reading

Hagberg’s Broccoli Salad

Sure, we’re the “Meat Place,” but we want you to eat your vegetables, too. But we don’t just want you to eat your veggies. We want you to REALLY enjoy eating your veggies. And believe me; you’ll love our Broccoli Salad. We start with crispy, fresh broccoli. Then we add in red onions, craisins, and sunflower seeds and mix it all in our sweet mayo dressing.

Continue reading

Aunt Nettie’s Beans

Black beans, butter beans, kidney, and navy beans sweetened with a bit of brown sugar and baked with freshly ground Hagberg’s burger and Hagberg’s smoky bacon.

Continue reading